OCI_Functions&OCI Schedulerでジョブ実行
Categories:
TANITAのAPIから取得した情報をADBに格納するスクリプトを作ったので日次のジョブにした
Vaultに認証情報を格納
Vaultを作成
Identity & Security > Vault > Create VaultRegion: Tokyo
Compartment: Blogs
Name: TANITA
Region: Tokyo
Compartment: Blogs
Name: ADB
Encryption Keyを作成
Identity & Security > Vault > Vault > (TANITA) > Master Encryption Keys タブ > Create Key- Compartment: Blogs
- Name: TANITA_KEY
- Protection Mode: HSM (20ver./ monthまで無料らしい)
- Key Shape Algorithm: AES 256bits
Identity & Security > Vault > Vault > (ADB) > Master Encryption Keys タブ > Create Key
- Compartment: Blogs
- Name: ADB_KEY
- Protection Mode: HSM (20ver./ monthまで無料らしい)
- Key Shape Algorithm: AES 256bits
Secretを格納
Identity & Security > Vault > Vault > (TANITA) > Secrets > Create SecretCompartment: Blogs
Name: TANITA_ID
Encryption Key compartment: TANITA_KEY
Manual secret generation: Plain-Text :Valutにて
Compartment: Blogs
Name: TANITA_ADB_PASSWORD
Encryption Key compartment: TANITA_KEY
Manual secret generation: Plain-Text :Valutにて
Identity & Security > Vault > Vault > (ADB) > Secrets > Create Secret
- Compartment: Blogs
- Name: DBFREE23AI_WALLET_PASSWORD
- Encryption Key compartment: ADB_KEY
- Manual secret generation: Plain-Text : Valutにて
Object Storageのバケットの構成
Bucketの作成
Storage > Object Storage & Archive Storage > Buckets > Create Bucket- Name: TANITA_BUCKET
- Region: Tokyo
- Compartment: Blogs
- Default Storage Tier: Standard
- Encryption: Encrypt using Oracle managed keys
- その他はデフォルト
- Lifesycle policy: Delete after 7 days. (バケットの詳細ページのLifecycle Policy Rulesから設定できる)
ポリシー作成(Lifesycle policy設定のため必要)
- Name: enable_objectstorage-ap-tokyo-1_lifecycle_policy
- Compartment: Blogs
Allow service objectstorage-ap-tokyo-1 to manage object-family in compartment Blogs
OCI Autonomas Database
- 既存のAlways Freeのやつ使う
- Name: dbfree23ai
- Region: Ashburn
- Compartment: root
- User: TANITA_DB
- Password: Valutにて
- Options:Rest, Graph
CREATE TABLE body_metrics (
measure_date  DATE
	CONSTRAINT body_metrics_pk PRIMARY KEY,
value_json    JSON
);
OCI Funcitonsとして関数を作成、デプロイ
Application作成
Developer Services > Applications > Create application- Name: TANITA HealthPlanet App
- Region: Tokyo
- VCN: NW_Blogs (compartment: Blogs)
- Subnet: private subntet-NW_Blogs(Reagional) (compartment: Blogs)
- Shapoe: GENERIC_X86
- ※x86用にbuildするので
※Internet アクセスが必要なので(今回使用配置するプライベート)サブネットにNAT Gatewayへのルートがある必要がある(VCN Craete wizardで作ったのでデフォルトで付いてる)
- ※x86用にbuildするので
- 同じ構成以下2本も作成
- website_change_monitor
- oci_logging_usage_notification
Fn構成(Cloud Shellが使いづらかったのでローカルで構成した)
- https://docs.oracle.com/en-us/iaas/Content/Functions/Tasks/functionsquickstartlocalhost.htm
- https://docs.oracle.com/ja/solutions/build-secured-container-image-functions/deploying-custom-builds.html#GUID-3A39AB5D-D7D7-4A16-A6A0-4DDD58D0D546
- Fnインストール
docker@ubuntu24:~/fn_projects/fetch_healthplanet$ curl -LSs https://raw.githubusercontent.com/fnproject/cli/master/install | sh [sudo] password for docker: fn version 0.6.42 ______ / ____/___ / /_ / __ \ / __/ / / / / /_/ /_/ /_/` docker@ubuntu24:~/fn_projects/fetch_healthplanet$ fn version Client version is latest version: 0.6.42 Server version: ? docker@ubuntu24:~/fn_projects/fetch_healthplanet$- docker が動いている必要がある(ローカルdocker機でやったので動いてる)
sudo systemctl status docker- プロジェクト初期化
- 構文:
fn init --runtime python --name Function_name directory_name
- 構文:
docker@ubuntu24:~/fn_projects$ fn init --runtime python --name fetch_healthplanet fetch_healthplanet Creating function at: ./fetch_healthplanet Function boilerplate generated. func.yaml created. docker@ubuntu24:~/fn_projects$ ls -lR fetch_healthplanet/ fetch_healthplanet/: total 12 -rw-r--r-- 1 docker docker 576 Jun 15 01:38 func.py -rw-r--r-- 1 docker docker 219 Jun 15 01:38 func.yaml -rw-r--r-- 1 docker docker 11 Jun 15 01:38 requirements.txt docker@ubuntu24:~/fn_projects$- 互換性維持のため依存パッケージのバージョンは固定したほうがいいらしい(必須ではない)
- ※pip freezeでインストール済みのバージョンを出力出来るらしい
- →Pycharm(Tools > Sync Python requirments で抽出、fdkも含める(ラッパーもPycharm上で作ってそのあと抽出する)
- 諸々のスクリプトを開発環境からコピー
- func.pyをベースにoci_func.pyという名前でOCI functions用のラッパースクリプトを作成
- ※pip freezeでインストール済みのバージョンを出力出来るらしい
docker@ubuntu24:~/fn_projects$ cd daily-websnapshot-func/ docker@ubuntu24:~/fn_projects/daily-websnapshot-func$ ls -ltr total 12 -rw-r--r-- 1 docker docker 576 May 27 12:19 func.py -rw-r--r-- 1 docker docker 11 May 27 12:19 requirements.txt -rw-r--r-- 1 docker docker 218 May 27 12:19 func.yaml docker@ubuntu24:~/fn_projects/daily-websnapshot-func$ vi requirements.txt docker@ubuntu24:~/fn_projects/daily-websnapshot-func$ cat requirements.txt fdk>=0.1.93 oci==2.152.1 playwright==1.52.0 docker@ubuntu24:~/fn_projects/daily-websnapshot-func$- Dockerfile作る(結構試行錯誤した) 上から順に実行されていくらしい
- Playwrightが必要依存モジュールを入れる必要があるため
- --with-depsで簡単にインストールできるためubuntu系のイメージを使う
--target /python方式だとNumPyの依存モジュール関連でいろいろ汚くなってしまったのでvenv方式にした。
- --with-depsで簡単にインストールできるためubuntu系のイメージを使う
- Playwrightが必要依存モジュールを入れる必要があるため
cker@ubuntu24:~/fn_projects/fetch_healthplanet$ cat Dockerfile FROM ubuntu:24.04 ENV DEBIAN_FRONTEND=noninteractive RUN apt-get update \ && apt-get install -y --no-install-recommends \ python3 \ python3-pip \ python3-venv \ ca-certificates curl \ && rm -rf /var/lib/apt/lists/* RUN ln -sf /usr/bin/python3 /usr/local/bin/python \ && ln -sf /usr/bin/pip3 /usr/local/bin/pip # OCI Functions が強制する非特権ユーザ (uid/gid = 1000) # RUN groupadd -g 1000 fn && useradd -m -u 1000 -g fn fn # 依存パッケージ(Python)を vendor → /python へ # fdk と playwright は requirements.txt に書いておく WORKDIR /function COPY requirements.txt . # python -m pip install --upgrade pip はerror: externally‑managed‑environment になるため実施しない RUN python -m venv /opt/venv ENV PATH="/opt/venv/bin:${PATH}" RUN python -m pip install --no-cache-dir -r requirements.txt # Playwright ブラウザ本体 + OS 依存ライブラリを一発導入 # --with-deps が Ubuntu では apt を内部実行 #RUN playwright install --with-deps chromium # Playwrightはユーザーホーム配下にインストールされるが rootでインストール/実行はuid=1000のユーザーになるためインストール場所を決め打ち # crash dump用ディレクトリを書き込みができる/tmp配下に設定 ENV PLAYWRIGHT_BROWSERS_PATH=/ms-playwright \ XDG_CONFIG_HOME=/tmp/.chromium \ XDG_CACHE_HOME=/tmp/.chromium RUN mkdir -p /ms-playwright \ && playwright install --with-deps chromium COPY *.py . COPY .env . COPY Wallet_dbfree23ai ./Wallet_dbfree23ai ENV PYTHONPATH=/function # uid/gid=1000 で実行 # ubuntu はubutuユーザーが1000だった #USER fn ENTRYPOINT ["/opt/venv/bin/fdk", "/function/oci_func.py", "handler"] docker@ubuntu24:~/fn_projects/fetch_healthplanet$- func.yamlはruntimeをdockerにする ※versionはdeployのたびに自動でインクリメンタルされていく。
memory はチューニングパラメータ(Playwrightとか重い奴は512くらいにしたほうがいいらしい)今回はこれで動いたのでこのまま
docker@ubuntu24:~/fn_projects/daily-websnapshot-func$ vi func.yaml docker@ubuntu24:~/fn_projects/daily-websnapshot-func$ cat func.yaml schema_version: 20180708 name: daily-websnapshot version: 0.0.1 runtime: docker memory: 256 docker@ubuntu24:~/fn_projects/daily-websnapshot-func$- build(ローカルでコンテナイメージを作る) 事前テストみたいなもん
fn --verbose build →Function fetch_healthplanet:0.0.1 built successfully. と出ればOK- ociにつながるように構成する
ociツールのインストール(実行ディレクトリにインストールされてしまうので場所注意)
bash -c "$(curl -L https://raw.githubusercontent.com/oracle/oci-cli/master/scripts/install/install.sh)" oci setup config- contextの設定(アプリのデプロイ設定) →アプリごとに用意しておくのが吉
- エンドポイント一覧:https://docs.oracle.com/en-us/iaas/api/#/en/functions/20181201/
# --provider oracleにする。名前(fetch_healthplanet)は任意
fn create context fetch_healthplanet --provider oracle
# use以降はそのコンテキストに対しての設定になる
fn use context fetch_healthplanet
# コンパートメント(こっちがアプリケーションのコンパートメント)
fn update context oracle.compartment-id <OCID>
# 東京リージョン
fn update context api-url https://functions.ap-tokyo-1.oci.oraclecloud.com
# 小文字のみ(tokyoリージョンはnrtらしい)で、テナンシ名/アプリケーション名(これはリポジトリのプレフィックスになるのでアプリケーション名に合わせておいたほうがいい。ということで任意)
fn update context registry nrt.ocir.io/<tenancy>/fetch_healthplanet
# DEFAULTプロファイルを使う(config)
fn update context oracle.profile DEFAULT
# イメージのコンパートメントも設定する(こっちがContainer Registoryのコンパートメント)
fn update context oracle.image-compartment-id <OCID>
docker loginしてからデプロイ※トークン発行しなきゃいけない
- 初回はユーザー名、パスワード(Authトークン)入力、次回以降は /home/docker/.docker/config.json に保存されてるやつ使う
docker login nrt.ocir.io
Username: <tenancy>/oracleidentitycloudservice/<username>
Password: <Authトークン>

cd ~/fn_projects/fetch_healthplanet
fn -v deploy --app 'TANITA HealthPlanet App'


	→	Updating function daily-websnapshot using image nrt.ocir.io/<tenancy>/tanita_app/daily-websnapshot:0.0.3...
	→	Successfully created function: daily-websnapshot with nrt.ocir.io/<tenancy>/tanita_app/daily-websnapshot:0.0.3
アプリケーションの実行
- コンソール上からテスト実行は出来ないらしい。
echo -n '{"name": "Alice"}' | fn invoke 'TANITA HealthPlanet App' fetch_healthplanet
トラシューいろいろ
デプロイがタイムアウトしたときの設定
↓デプロイタイムアウト対応(今回こっちだけで解決)

export DOCKER_CLIENT_TIMEOUT=900
export COMPOSE_HTTP_TIMEOUT=900

↓実行タイムアウトはfunc.ymalに↓を記載したタイムアウト伸ばせるけど今回やってない(デフォルト30秒でOKだったので)

func.yaml に timeout: 120
ログの構成
エラーでた
docker@ubuntu24:~/fn_projects/fetch_healthplanet$ echo -n '{"name": "Alice"}' | fn invoke 'TANITA HealthPlanet App' fetch_healthplanet
Error invoking function. status: 502 message: function failed
docker@ubuntu24:~/fn_projects/fetch_healthplanet$
ファンクションを呼び出すと、ファンクションの失敗メッセージおよび502エラーが返されます🔗
ファンクションのコードに問題がある場合は、ファンクションの起動時に次のエラーが表示されます:
ログが構成できるらしい
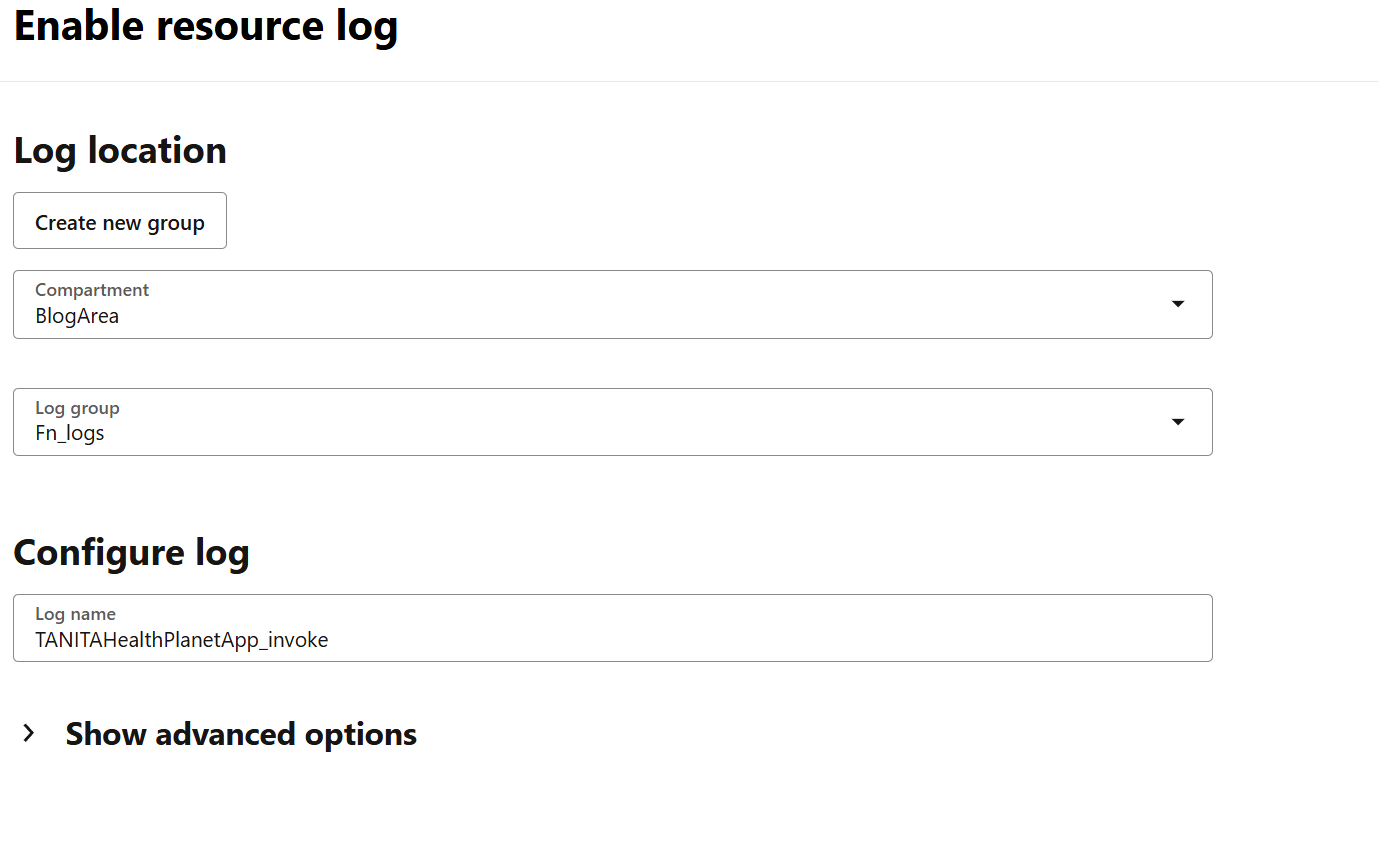
Applications >(Application名) > Monitoring タブ
右端オプションメニューから Enable logにて
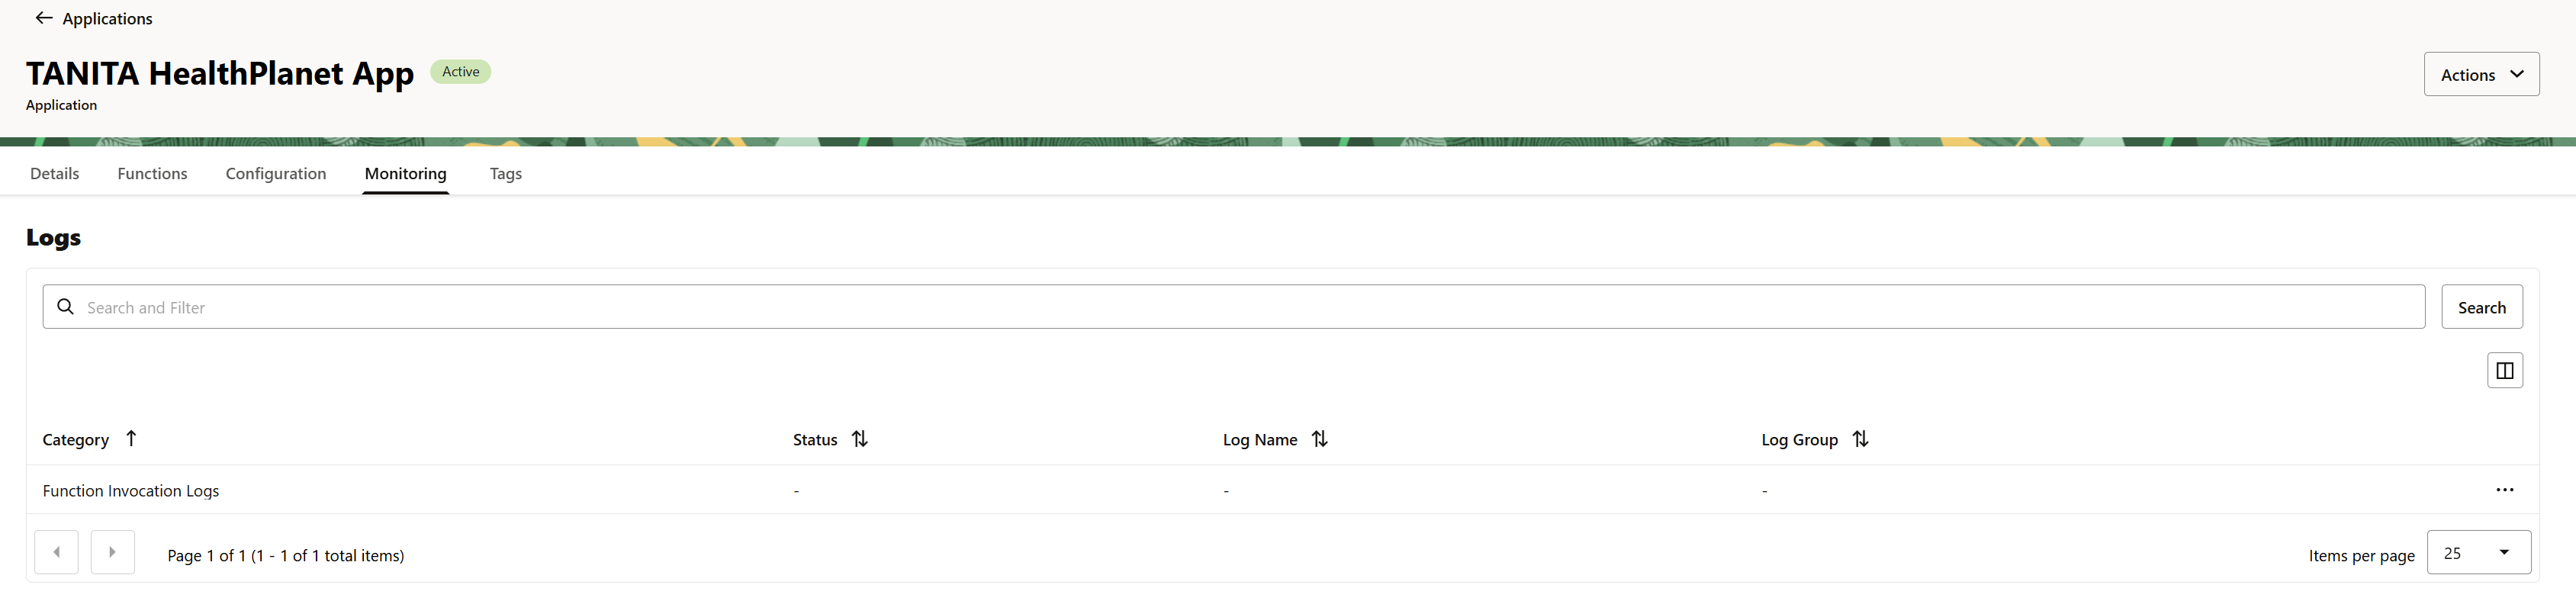
事前にロググループは用意しておく必要がある:Observability & Management > Logging > Log Groups > Create Log Group にて
ちゃんとエラー出てる。標準出力が記録されるっぽい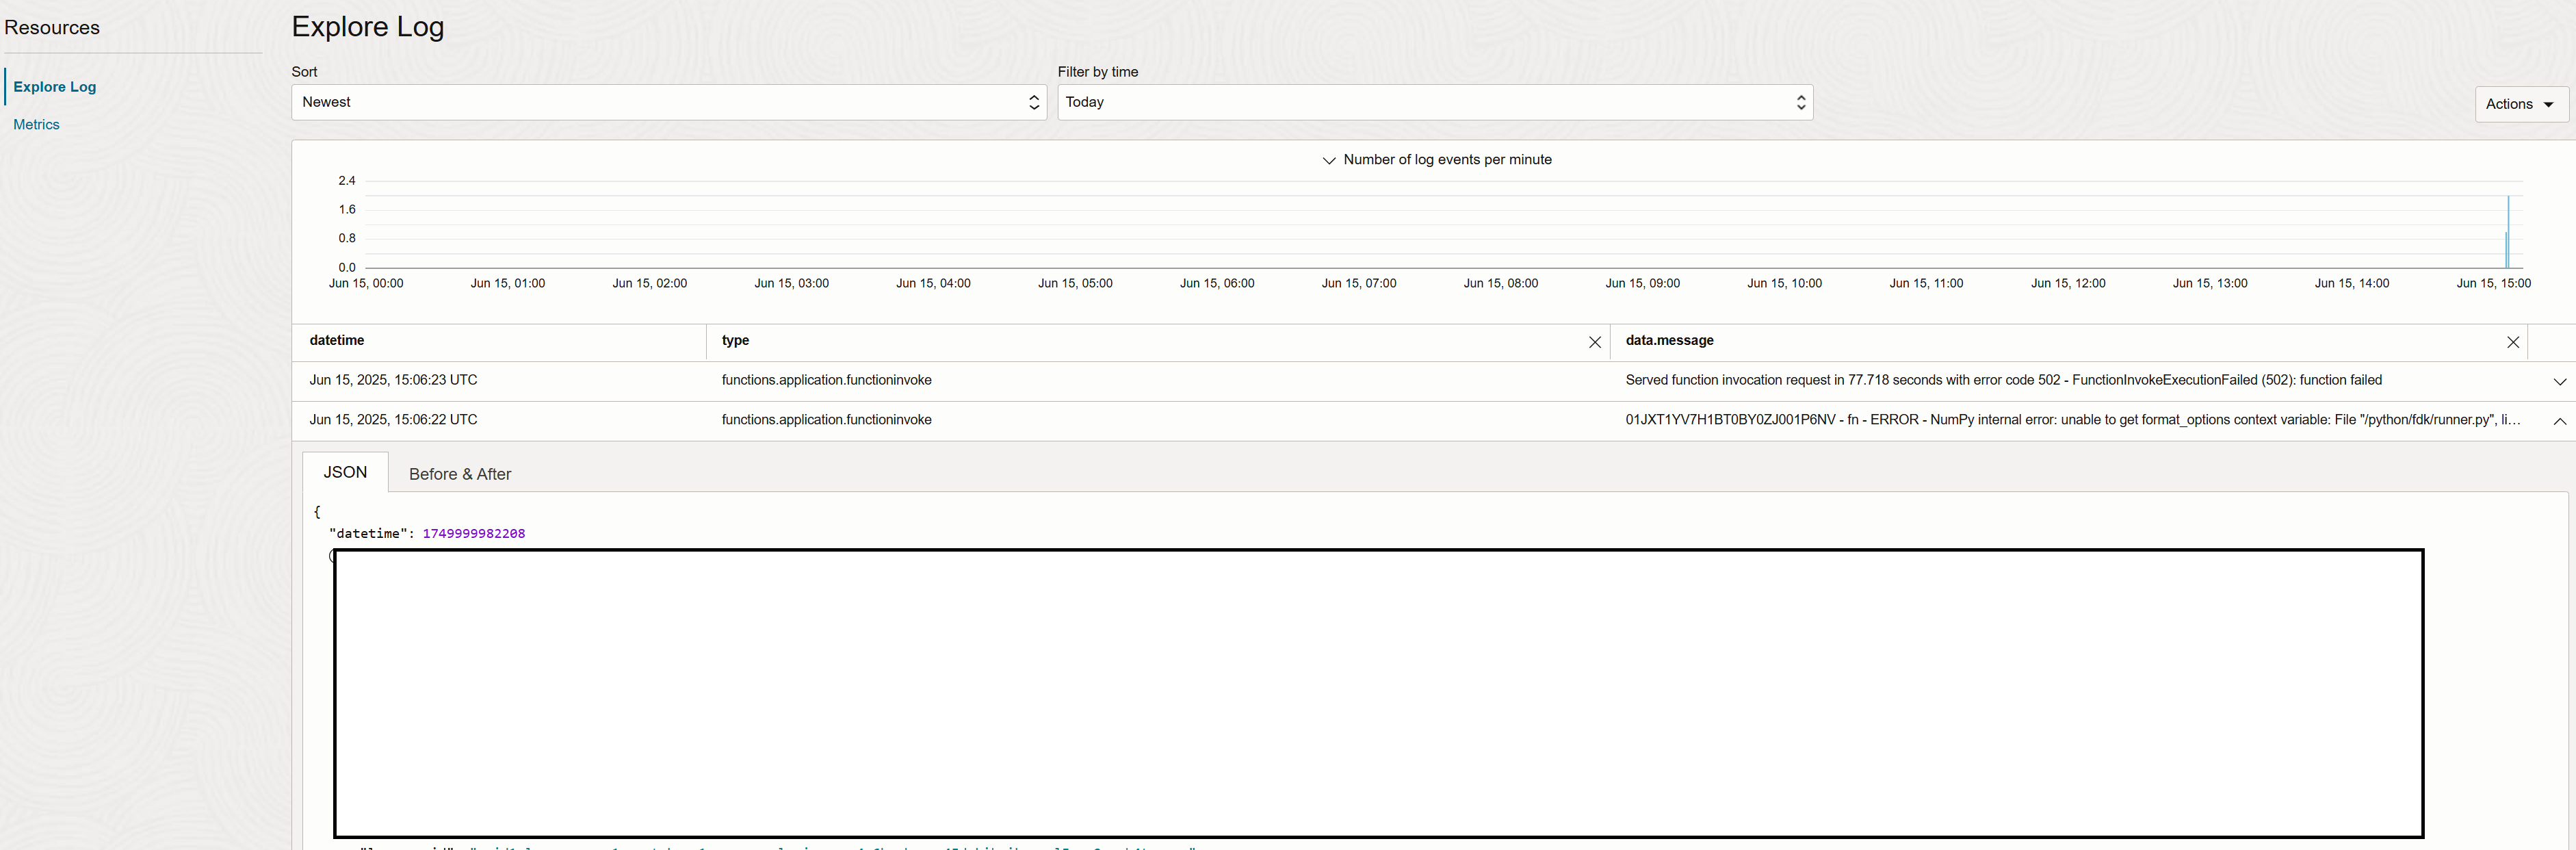
このログ見にくいな。。1行毎にJsonオブジェクトとして出力される。Pythonのスタックトレース見るのめちゃだるい。Sort をOldestにするとよい。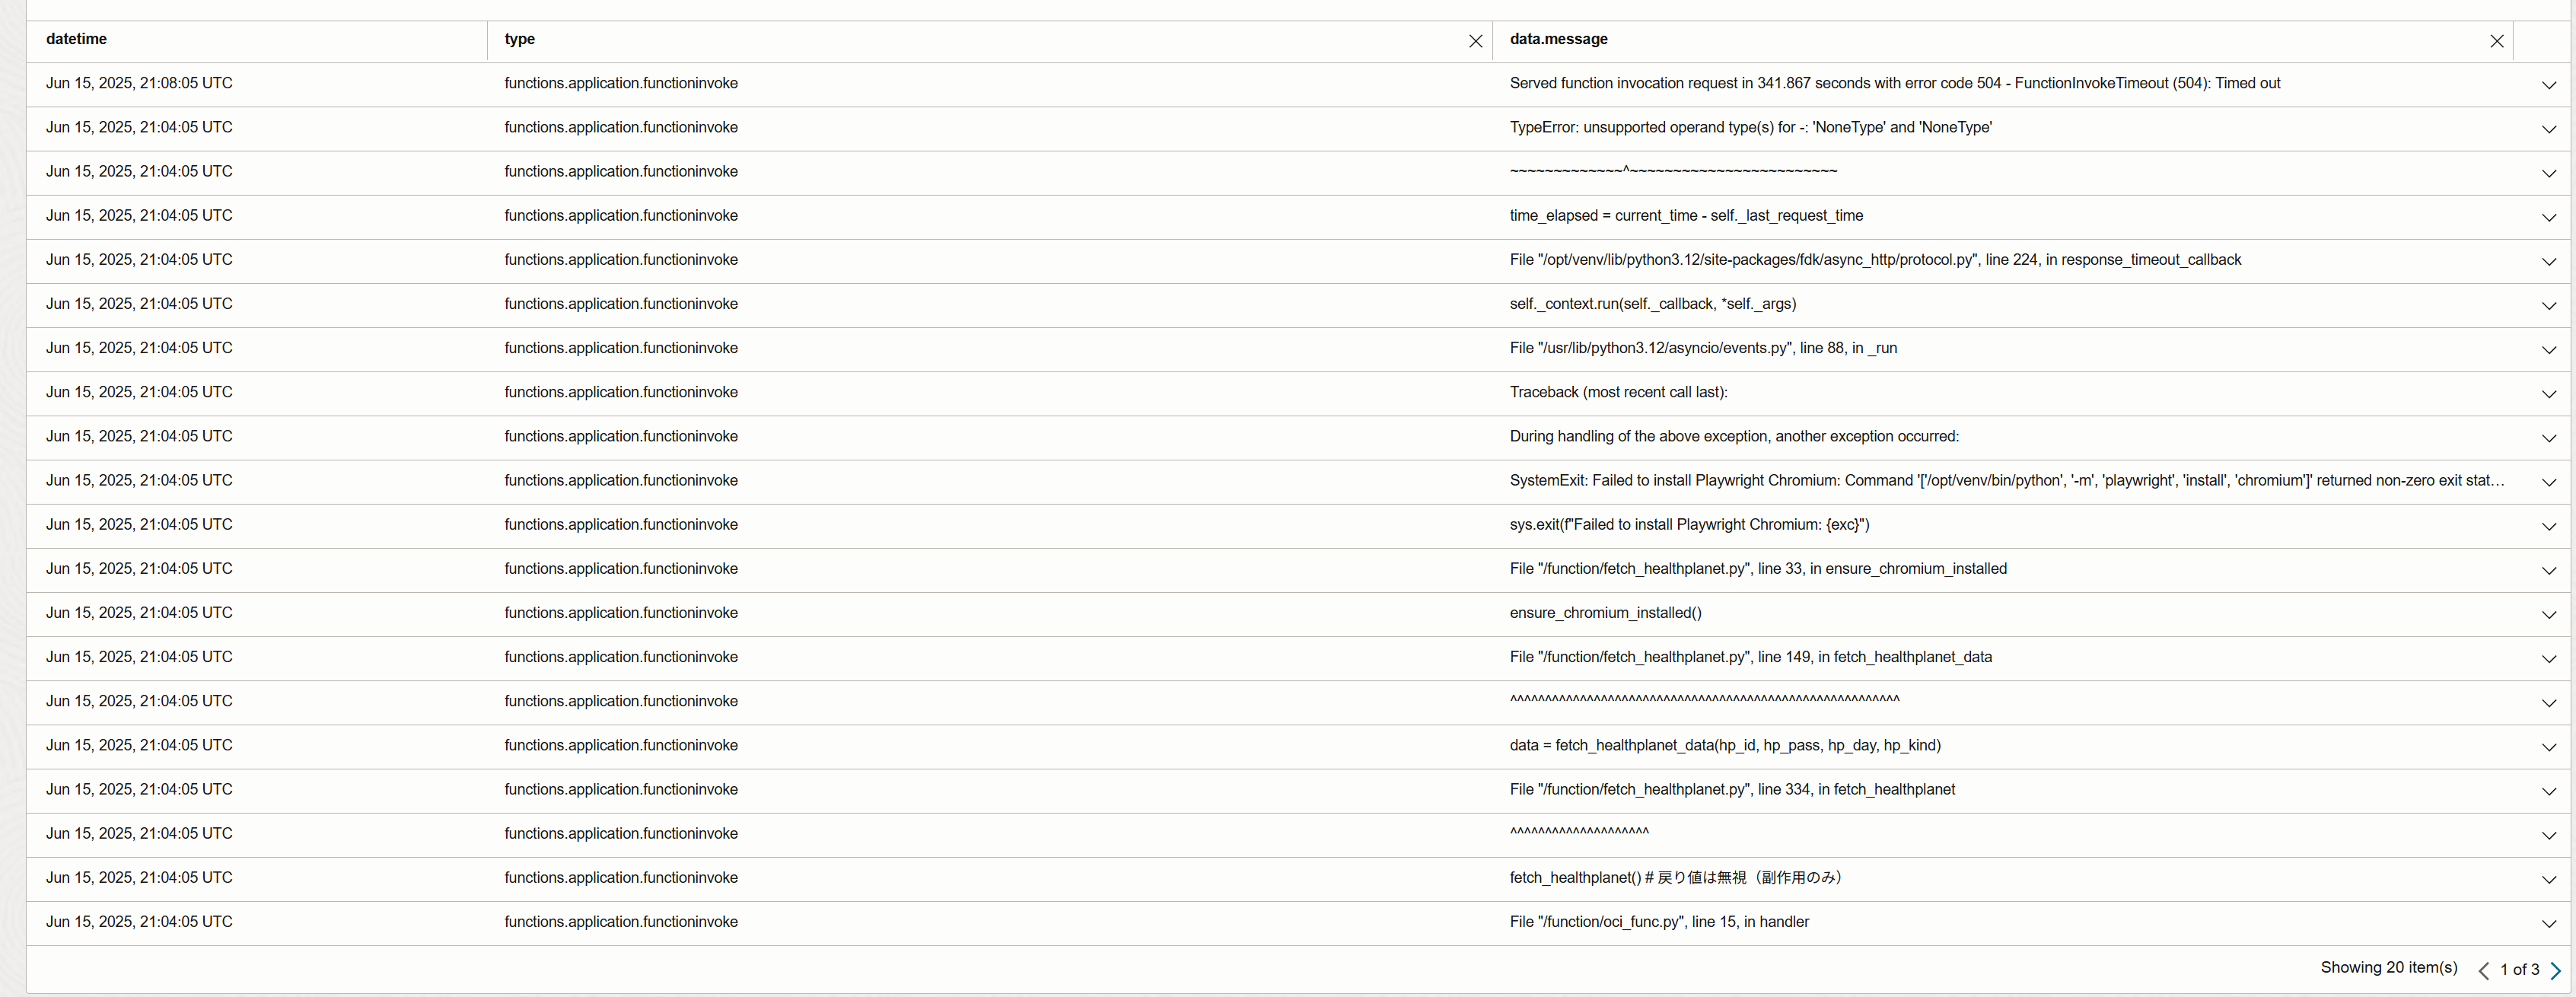
ローカルコンテナ上での実行確認
numpyの依存モジュールのcontextvarsが一緒に/python配下にインストールされてしまい、ENV PYTHONPATH=/function:/pythonによりシステム標準よりも先に読まれてしまいimport numpyがエラーになってしまうという事態になったので、ローカルでビルドしてdocker runでログインしてというのをやった。
ちなみに俺みたいなdocker初心者はキャッシュではまるので-no-cacheをつけておいたほうが結果良いという判断になった。
fn --verbose build --no-cache
docker run --rm -it --entrypoint /bin/bash --user root nrt.ocir.io/<tenancy>/fetch_healthplanet/fetch_healthplanet:0.0.24

docker@ubuntu24:~/fn_projects/fetch_healthplanet$ docker run --rm -it --entrypoint /bin/bash --user root fetch_healthplanet
root@32b533b4d148:/function# python
Python 3.12.3 (main, Feb  4 2025, 14:48:35) [GCC 13.3.0] on linux
Type "help", "copyright", "credits" or "license" for more information.
>>> import numpy
>>
キャッシュを使用しないデプロイ(–no-cache)とバージョンをインクリメントしないデプロイ(-no-bump)のオプション
fn -v deploy --app 'TANITA HealthPlanet App' --no-cache --no-bump
実行タイムアウト延長の設定
docker@ubuntu24:~/fn_projects/fetch_healthplanet$ echo -n '{"name": "Alice"}' | fn invoke 'TANITA HealthPlanet App' fetch_healthplanet
Error invoking function. status: 504 message: Timed out
docker@ubuntu24:~/fn_projects/fetch_healthplanet$
→func.yamlに timeout: 300を追加し再デプロイ
マネコンからも変更できるらしい。こっちは再デプロイいらないっぽい。けど、管理が面倒なのでfunc.yamlに記載した。再デプロイしたら↓の画面も更新された。
初期化失敗のエラー
docker@ubuntu24:~/fn_projects/fetch_healthplanet$ echo -n '{"name": "Alice"}' | fn invoke 'TANITA HealthPlanet App' fetch_healthplanet
Error invoking function. status: 504 message: Container failed to initialize, please ensure you are using the latest fdk and check the logs
docker@ubuntu24:~/fn_projects/fetch_healthplanet$
→マニュアルを参考にmemory を512に増やした。でもダメだった。ログ見たら原因は別だった。OCI functionsのログ確認めっちゃだるいけどログ見るの大事。
contextの設定が間違っていてアクセスできてない場合ありんご。
確認:cat /home/docker/.fn/contexts/oci_logging_usage_notification.yaml この辺にありんご。fn inspect context context名でもOK
docker@ubuntu24:~/fn_projects/oci_logging_usage_notification$ fn -v deploy --app 'oci_logging_usage_notification'  --no-cache --no-bump

Fn: [GET /apps][404] ListApps default  &{Fields: Message:Authorization failed or requested resource not found.}

See 'fn <command> --help' for more information. Client version: 0.6.42
docker@ubuntu24:~/fn_projects/oci_logging_usage_notification$
IAMポリシー構成
Functions のダイナミックグループ作成
Identity & Security > Domains > (OracleIdentityCloudService) > Dynamic groupsタブ > Create dynamic group
NAME: Dynamic_Group_Functions
ALL {resource.type = 'fnfunc', resource.compartment.id = '<OCID>'}
ダイナミックグループに各OCIリソース(スクリプトから使用するリソース)の権限を振る
Identity & Security > Policies > Create Policy
NAME: Policy_Functions_Use_OCI_Resources
Compartment: Blogs
Allow dynamic-group OracleIdentityCloudService/Dynamic_Group_Functions to read secret-bundles in compartment BlogArea
Allow dynamic-group OracleIdentityCloudService/Dynamic_Group_Functions to manage objects in compartment Blogs where target.bucket.name = 'TANITA_BUCKET'


allow dynamic-group OracleIdentityCloudService/Dynamic_Group_Functions to read metrics in compartment BlogArea
allow dynamic-group OracleIdentityCloudService/Dynamic_Group_Functions to read compartments in compartment BlogArea
ダイナミックグループに各OCIリソース(スクリプトから使用するリソース)の権限を振る(root)
Identity & Security > Policies > Create Policy
NAME: Policy_Functions_Use_OCI_Resources_root
Compartment: root
allow dynamic-group OracleIdentityCloudService/Dynamic_Group_Functions to read loganalytics-storage in tenancy
※User/Group access polices for loganalytics-features-family aggregated resource type and any of its individual resources must be created at tenancy or root level.
https://docs.oracle.com/en-us/iaas/logging-analytics/doc/iam-policies-catalog-logging-analytics.html
features‑family なら必ず in tenancyらしい。
IAM ポリシーは即時反映されないのでデバッグがしにくい。
https://docs.oracle.com/en-us/iaas/Content/Identity/Tasks/managinggroups.htm
OCI Resource Scheduler
スケジュール登録
Governance & Administration > Resource Scheduler > Schedules > Create a schedule
- Name: TANITA_HealthPranet_APP
- Region: Tokyo
- Compartment: BlogArea
- Action to be executed: Start
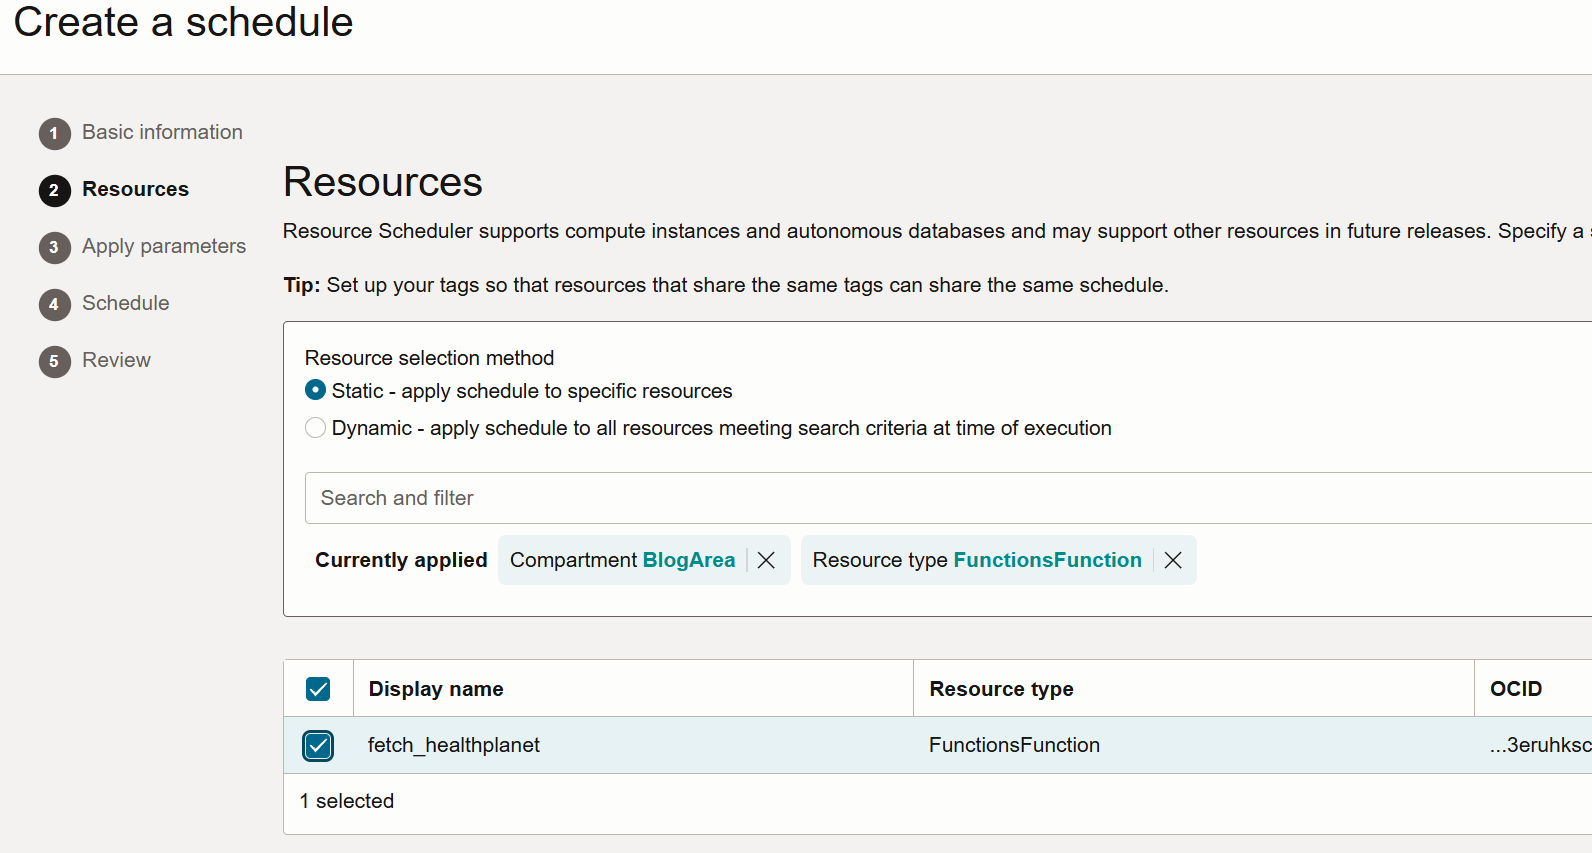
- Resources: dily-websnapshot(下の様にタイプでフィルタしながら選択できる)
パラメータの指定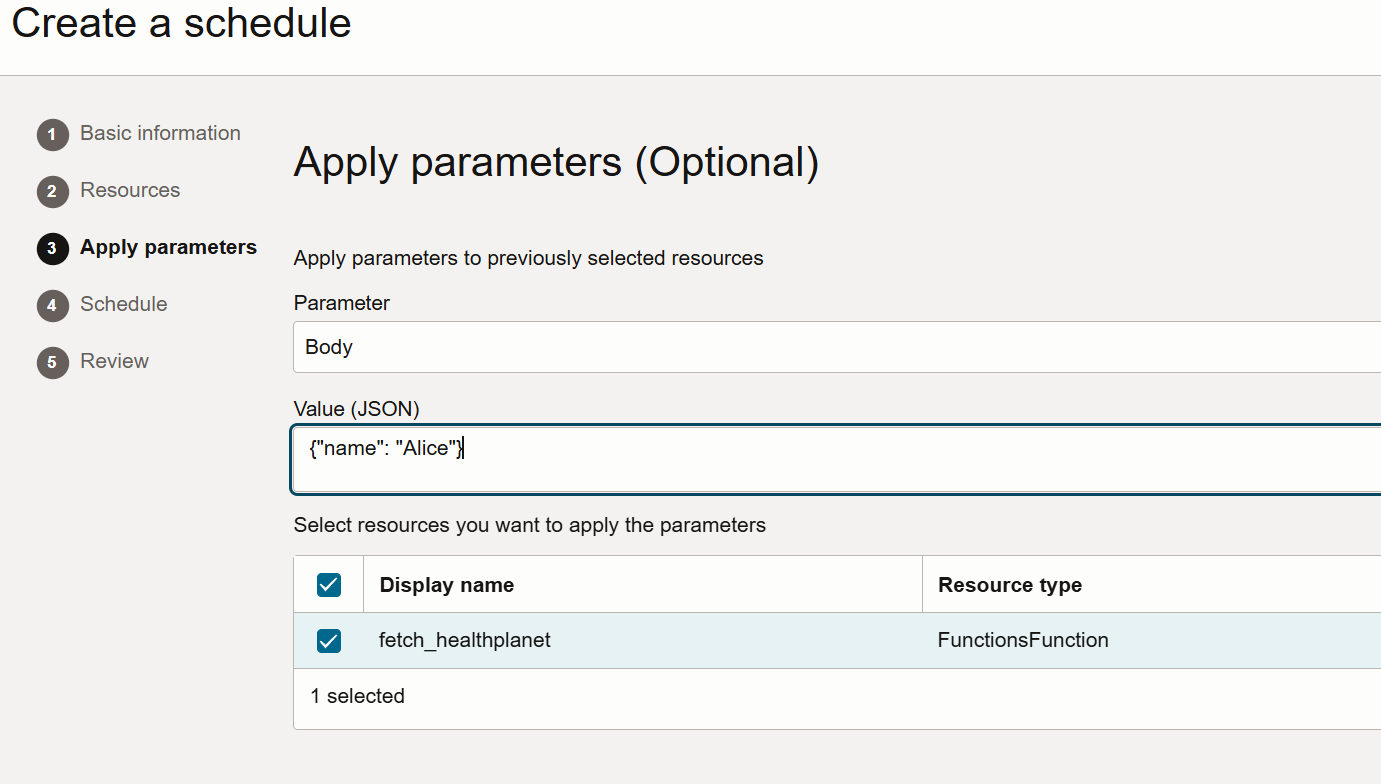
スケジュール
→時刻UTC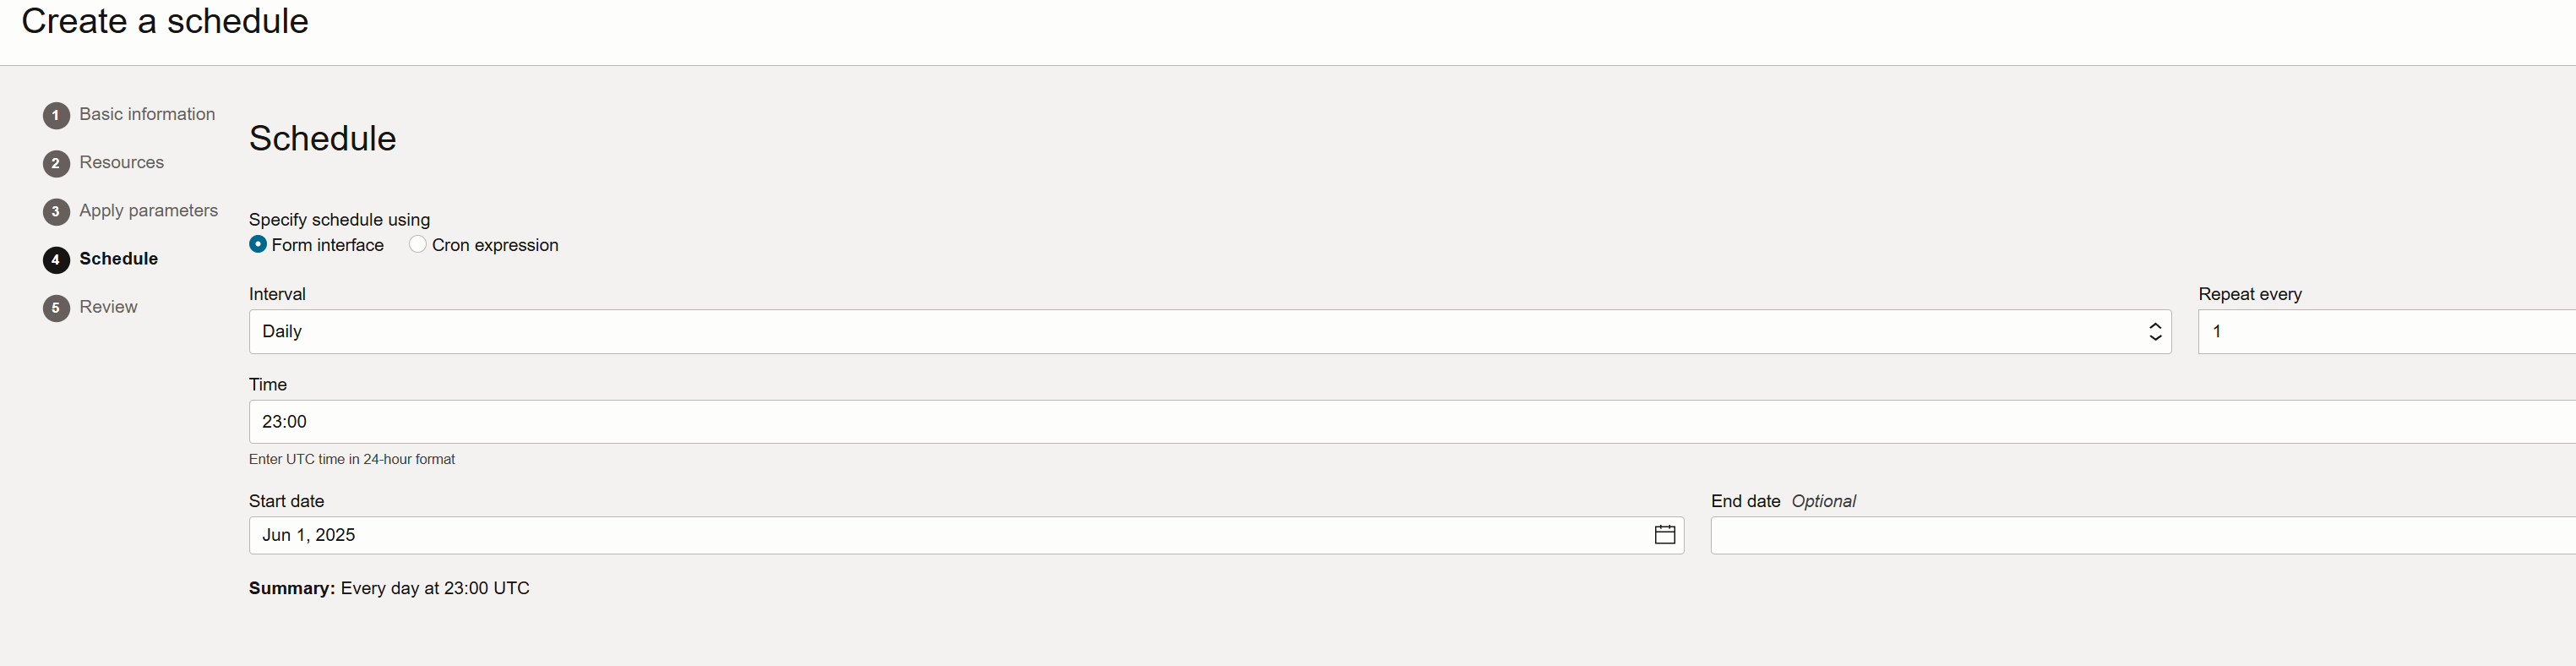
上手にできました。
権限付与(Scheduler →Functions)
Scheduler のダイナミックグループ作成
Identity & Security > Domains > (# OracleIdentityCloudService) > Dynamic groupsタブ > Create dynamic group
NAME: Dynamic_Group_Schedulers
ALL {resource.type = 'resourceschedule', resource.compartment.id = '<OCID>'}
※ここハマっところマニュアル見るとuse fn-invocationだけでいいっぽい記述あるがいろいろ試した結果to read fn-functionがないと404エラーになる。
ダイナミックグループにFunctionを呼び出せる権限を振る
Identity & Security > Policies > Create Policy
NAME: Policy_Schedulers_Use_Functions
Compartment: Blogs
Allow dynamic-group OracleIdentityCloudService/Dynamic_Group_Schedulers to use fn-invocation in compartment Blogs
Allow dynamic-group OracleIdentityCloudService/Dynamic_Group_Schedulers to read fn-function in compartment Blogs
その他メモ
テンプレ作れるらしいけどそんなに大量生産しないしな。
https://github.com/fnproject/docs/blob/master/cli/how-to/create-init-image.mdfn deploy –no-bump バージョンはね上がらない。
OCCRのローテーションポリシーでイメージ削除できるっぽいがとりあえずめんどくさいので今度で。
イメージが膨れ上がる
トライアンドエラー繰り返してたらイメージでローカルのディスクがパンクした。ゴミ掃除必要。
docker@ubuntu24:~/fn_projects/fetch_healthplanet$ df -h
Filesystem                         Size  Used Avail Use% Mounted on
tmpfs                              795M  2.2M  793M   1% /run
/dev/mapper/ubuntu--vg-ubuntu--lv  116G  110G   64M 100% /
tmpfs                              3.9G     0  3.9G   0% /dev/shm
tmpfs                              5.0M  8.0K  5.0M   1% /run/lock
/dev/sda2                          2.0G   98M  1.7G   6% /boot
tmpfs                              795M   92K  795M   1% /run/user/120
tmpfs                              795M   76K  795M   1% /run/user/1000
docker@ubuntu24:~/fn_projects/fetch_healthplanet$ df -h
Filesystem                         Size  Used Avail Use% Mounted on
tmpfs                              795M  2.2M  793M   1% /run
/dev/mapper/ubuntu--vg-ubuntu--lv  116G  110G   65M 100% /
tmpfs                              3.9G     0  3.9G   0% /dev/shm
tmpfs                              5.0M  8.0K  5.0M   1% /run/lock
/dev/sda2                          2.0G   98M  1.7G   6% /boot
tmpfs                              795M   92K  795M   1% /run/user/120
tmpfs                              795M   76K  795M   1% /run/user/1000
docker@ubuntu24:~/fn_projects/fetch_healthplanet$ docker system df
TYPE            TOTAL     ACTIVE    SIZE      RECLAIMABLE
Images          63        22        24.39GB   21.32GB (87%)
Containers      33        7         119.9MB   16.1MB (13%)
Local Volumes   15        2         512.3MB   457MB (89%)
Build Cache     506       0         57.34GB   57.34GB
docker@ubuntu24:~/fn_projects/fetch_healthplanet$ docker builder prune -a
WARNING! This will remove all build cache. Are you sure you want to continue? [y/N] ^CERROR: got 1 SIGTERM/SIGINTs, forcing shutdown
docker@ubuntu24:~/fn_projects/fetch_healthplanet$ docker builder prune -a
WARNING! This will remove all build cache. Are you sure you want to continue? [y/N] y
ID                                              RECLAIMABLE     SIZE            LAST ACCESSED
mjmvdrbvxwhrooe8nvd1oabmh                       true            4.936kB         4 weeks ago
m5ivspirbqrxz3reuu2sr6t21*                      true    1.32kB          2 weeks ago


docker@ubuntu24:~/fn_projects/fetch_healthplanet$ docker system df
TYPE            TOTAL     ACTIVE    SIZE      RECLAIMABLE
Images          63        22        24.39GB   21.32GB (87%)
Containers      33        7         119.9MB   16.1MB (13%)
Local Volumes   15        2         512.3MB   457MB (89%)
Build Cache     0         0         0B        0B
docker@ubuntu24:~/fn_projects/fetch_healthplanet$ df -h
Filesystem                         Size  Used Avail Use% Mounted on
tmpfs                              795M  2.2M  793M   1% /run
/dev/mapper/ubuntu--vg-ubuntu--lv  116G   54G   57G  49% /
tmpfs                              3.9G     0  3.9G   0% /dev/shm
tmpfs                              5.0M  8.0K  5.0M   1% /run/lock
/dev/sda2                          2.0G   98M  1.7G   6% /boot
tmpfs                              795M   92K  795M   1% /run/user/120
tmpfs                              795M   76K  795M   1% /run/user/1000
docker@ubuntu24:~/fn_projects/fetch_healthplanet$
- Container Registryはretention policyで削除できる。古いイメージはpullされない日数条件で削除されるはず。
runtime : pythonでつくる
→Pyhon外のライブラリインストールが不要なスクリプトはruntime pythonで実行できる(⇒Dockerfileを作る必要ない)
一部のジョブはこちらで作成
docker@ubuntu24:~/fn_projects/oci_logging_usage_notification$ cat func.yaml
schema_version: 20180708
name: oci_logging_usage_notification
version: 0.0.1
runtime: python
build_image: fnproject/python:3.11-dev
run_image: fnproject/python:3.11
entrypoint: /python/bin/fdk /function/oci_func.py handler
memory: 256
docker@ubuntu24:~/fn_projects/oci_logging_usage_notification$ fn -v deploy --app 'oci_logging_usage_notification'  --no-cache --no-bump
echo -n '{"name": "Alice"}' | fn invoke oci_logging_usage_notification oci_logging_usage_notification
- Name: Toci_logging_usage_notification
- Region: Tokyo
- Compartment: Blogs
- Schedule:Every day at 17:00 UTC